Saturday, September 1, 2007

ABOUT ME


I have been a playing and teaching professional golfer since 1993. I won the 2000 Taiwan LPGA Open Championships. I competed on professional tours in the US, Asia and Europe. I also have a record of 7 hole-in-ones.
I have personally worked with top instructors like David Leadbetter, Ben Doyle, Steve Bann, Ian Trigg, David Glenz, Craig Shankland, Mike Adams, John Redman, Mike Bender, Brian Mogg, Mike Austin, Craig Harmon, Patti McGowan, Robert Baker, Karen Palacios and AJ Bonar.

Click Here! Easy Tips And Techniques To Quickly Transform Your Game And Add 20 Yards To Your Drives!

MY METHOD

Everyone swings the club differently. There are certain fundamental actions needed in all good golf swings, everyone is different in how they adapt those actions. I work to build your swing in the manner best suited to your characteristics, age, weight, flexibility, and also whether you learn better visually, verbally, or a combination of both.

The information is from top experts, other resources and personal experience. I focus on building strong fundamentals. You will develop many bad habits with poor fundamentals and wrong concepts. Golf is like learning music or art. It takes patience, good attitude and an open mind to learn. Sometimes you may get really frustrated when you don't swing the club well, when that happens, go back to the basics.

Click Here! Top Golf Fitness Trainer And Learning Expert In Rapid Fat Loss While Gaining Lean Muscle Combine Forces To Bring Golfers An Excit.

PRACTICE

Golfers often hit roadblocks in their improvement. The better you get, the more difficult it becomes to shave off strokes. Here are a few tips that might help you reach your goals: Get involved in a physical fitness program. Some people who are overweight and stiff don't improve simply because they are physically unable to make a good golf swing.

Get solid instruction from a professional. Don't try to figure it out by yourself. Improvement requires patience; a slight change in your swing might take months to become comfortable. If you're impatient, you're in for a lot of frustration. Always remember that no one, no matter how long they've played and how many lessons they've taken, has never mastered golf. Have a good attitude and keep things in perspective.

When going to the range try the following:

  • Stretch
  • Start with a short iron, take easy swings, then progress up to the longer clubs
  • Focus on fundamentals and tempo
  • Balance your practice by working on different areas of your game
  • STOP when tired!!! No point practicing when you can't focus or make proper swings.

Be very patient taking one step at a time and focusing on not more then a couple things at a time. Get help with a professional who focus on fundamentals.

Click Here! Online Golf Biomechanics Analysis And Tailor-Made Golf Fitness Training Program That Analyzes And Fixes Your Posture, Mucle Imbalances And Swing Faults For A Better Golf Game.

GRIP

Grip sits under heelpad and middle of left index finger

Thumb and finger touches. V formed between thumb and index finger points toward right shoulder.

Secure grip in middle fingers of right hand


Right life line covers left thumb. V formed on right hand points between chin and right ear.


See at least 2 knuckles on left hand


Ten Finger Grip


Overlap Grip


Interlock Grip


HOW TO TAKE YOUR GRIP


  • Start by holding the club on the shaft with the right hand in front of your chest clubhead pointing upward, square clubface.(the leading edge or bottom of clubhead should be verticle)
  • Place the grip on the left fingers. The grip should lie diagonally across the bottom crease of your left pinkie and middle of your index finger.
  • Wrap your fingers around the grip and place your left palm/heel pad over the top of the grip. You want to see at least 2 knuckles on your left hand.
  • For the right hand, wrap the 3 middle fingers of your right hand under the grip.( your right ring finger and your left index finger should touch) Then place your right lifeline over your left thumb.
  • Your thumbs and index fingers should touch without big gaps between them. Make sure there are no gaps between your fingers and the grip as well.
  • There are 3 variations for the right pinkie position.

1. 10 finger or baseball grip: All 10 fingers will be on the grip. This is recommended for juniors or people with really small hands.

2. Overlap or Vardon grip: Place your right pinkie on top the crease between your left index and middle fingers. This is the most commonly used grip.

3. Interlocking: Your just interlock your right pinkie with your left index finger. Jack Nicklaus and Tiger Woods uses this grip.

GRIP PRESSURE

The grip pressure must remain light and constant throughout the swing. Medium grip pressure is the best. Imagine holding a small bird or animal, or a ripe banana. If you squeeze it too tight, you will choke it and kill it, or squash the banana. Just firm enough to hold it but light enough to feel the weight of the clubhead. If your veins pop up, most likely you're gripping it too tight, so save it for blood donation.If your grip pressure is light and the club is in your fingers, you will have an easy time setting (or hinging) the club. If there's little gap between between your thumb and index fingers, you will have a hard time setting the club and controlling the clubface at the top of your swing. Show some butt on the grip. If you wear out your gloves near the base of your hand, your left hand is probably too high on the club. The back of your palm should be even with the top edge of the grip. You'll immediately feel more in control of the club.

PROPER GRIP SIZE

If your grips are the proper width for you, the middle two fingers of your glove hand should gently touch your palm. If they dig into your palm, your grips are too thin and you'll have a tendency to hook the ball. If your fingers don't reach your palm, your grips are too fat, and you probably will fight a slice.When you have a proper grip, you can set it earlier in your backswing and hold your wrist angles longer, allowing the larger muscles of your body to be more in control of your swing and to square the clubface. This passive hands/active body swing better suits today's technology because modern balls spin less and shaft technology is more consistent, so the ball flies straighter than ever before. Consequently, you don't need to use your hands as much to keep the ball online.

REMEMBER, GRIP THE CLUB IN YOUR FINGERS WITH A LIGHT GRIP PRESSURE TO KEEP YOUR ARMS SOFT SO YOU CAN FEEL THE WEIGHT OF THE CLUBHEAD.

Click Formed Grips , for grip learning aids, comes in different sizes.
Click Perfect Grip (Mark O'Meara), for experiencing how it actually feels when you hit a ball using precisely the same grip techniques as the world's best professionals.

STANCE OR POSTURE


Shoulder and spine tilts to the right.


Weight is on the balls of the feet, arms hanging from the shoulders. Bend over from hips , flex knees slightly.


Upper body tilts slightly to the right. Inside of heels matches with inside of shoulders

STANCE POSTURE


Let's start with a short iron like 7 or 8 iron. The tilt in your spine and width of your stance will increase slightly as the length of the club increases.


  • Hold the club and let it rest in front of your body.


  • Take your stance approximately shoulder width with your toes pointing out 20 to 30 degrees. The inside of your heels should match the with the inside of your shoulders for irons. For woods, just stand a couple inches wider.


  • Flex your knees slightly with the weight on the balls of your feet evenly distributed on both feet.


  • Bend over from your hip flexor and tilt slightly to the right. Keep bending over until the clubhead grounds, about 3 inches inside of your left heel.


  • Point the butt of your grip towards your waistline, with your hands in front of the inside of your left thigh


  • Keep your chin up.


Checkpoints:


  • You should feel very atheletic at the address position, leaning forward slightly


  • A straight line should form from between the back to the middle of the shoulder, touching the front of the knees and on top of the balls of the feet(usually the shoelaces closest to the toes)


  • There should be a gap for a fist to fit through between the back of your hands and the front of your thighs


  • Your arms should hang naturally from your shoulders


  • Hands should be directly under chin


  • Wiggle your toes, make sure your weight is on the balls of your feet

BALL POSITION


As the club gets longer, you stand futher away from the ball.


DISTANCE FROM THE BALL

  • As long as your posture is in the right position with your arms hanging naturally, the distance between you and the ball should be right.To check that, take your address with the golf club. Keep your left hand on the grip and maintain your posture. Release your right hand. Both the arms should match evenly, if one is closer or further, you will need to make adjustments so both arms are even side by side.

    WHERE TO PLACE THE BALL

    Unless you're trying to hit special shots, always position the ball more less under the logo of your shirt or under your left armpit. The ball position for the driver 3 wood are inside your left heel.

  • Place both feet together with ball between toes
  • Move your left foot about 3 inches left of the ball and the right according to the club you are using


ALIGNMENT


Like the railway track

Body and Target lines are parallel


Think of the alignment as a railroad track. The outer track is the target line or the clubface line. The inner track is your body line.

  • Take your grip
  • Place your clubhead perpendicular to your target
  • Place both your feet together with your right toe pointing to the golf ball
  • Spread your feet according to different clubs, ball between your toes for short irons, and all the way up on your left heel for driver.
  • Make sure your toes, knees shoulders and head are parallel to the target line. Which means your body is aiming to the left of your target.
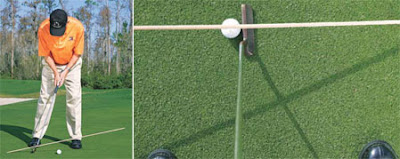
It is imperative to take dead aim. Poor alignment will cause uneccessary swing compensation. When you hit your shot off your target thinking you aimed properly, you start making adjustments in your swing to get the ball on line. Lay a club down close to your toes to ensure proper alignment when practicing, just make sure it's parallel to your target line.

TAKEAWAY


The drill can be done by using any object, box of golf balls or tissue. Place the ball about a foot behind the ball on the target line. If using a box, place it directly behind the clubhead at address position. The idea is to keep your takeaway on path.


The takeaway is the first part of the back swing.The key is to take it back squarely and on plane with the body and arms working together as one unit.

Place a club in front of your toes the the right of your right foot. Make sure it's parallel to the feet line. Then place a box of golf balls or tissue behind your clubhead at address position.


  • Start your takeaway by moving your arms and body together, the box of balls should go straight back. If the box spins, that means your arms and body are working separately or you are lifting or rolling your arms too much.


  • Stop about halfway up when the shaft is parallel to the ground. The club you are holding should be right on top of the club on the ground. Your grip should look almost same as address position. If you're wearing a watch on your left hand, the watch should face in front of you, not towards you or the ground.


Here’s another drill to feel how the arms and body work together.

  • Stick the butt of the grip in your belly button and get into your proper posture.
  • Move the club back a couple feet maintaining same angle of the shaft from the start with the grip in front of your belly button. You should feel a slight rotation and weight shift in your body to the right side.
  • Swing through a couple feet.
  • Repeat this back and through
  • Key is to feel how the arms and body are connected.


That’s how the takeaway starts and how the arms and body stay connected

3/4 BACKSWING

BAD [left] Keep your hips still and you'll end up in a reverse pivot at the top. GOOD [right] Turn just enough so your left knee moves in front of the right


L to L or 9 to 3 o'clock positions


  • From the takeaway, continue to rotate your body and arms and hinge your wrist until your left arm is parallel to the ground.

  • Your weight will be more on your right hip.

  • Your spine is centered over the ball.

  • Your left arm will be fairly straight but not rigid. That will maintain the proper width in the backswing. It should also be parallel and directly above your toe line.

  • A rough right angle will form between your left arm and shaft and your right bicep and forearm.

  • Your shoulders are turned about 75 degrees, hips close to 45 degrees.

  • The butt of the shaft should point more or less towards your target line.

  • From there, start the downswing by shifting your weight to your left side followed by hands leading the clubhead.

  • You want to catch the ball first then the ground. Keep your eyes focused on the inner quater of the ball, 3-9 o'clock spot.

  • You want to finish with weight on your left side, hips facing the target with weight on your left, club in front of you.

Swing freely with miminal tension. Feel the weight of the clubhead and use that to swing down and through the ball. Practice this 3/4 backswing until you consistently hit crisp shots before you move on to the full swing. If you're practicing on grass, the divot should start after the ball.

FULL BACK SWING


Coil into your right side

Spine angle remains the same at address and backswing . Spine angle training aid, click on Golf Swing Controller


Chest is facing back of target, weight is loaded into right hip


The full backswing is just additional rotation creating more torque or coil in your back. Be sure to wind up or coil into your right rather then bend your arms excessively, lift or sway your body away.


  • From the 3/4 backswing position, just continue to rotate your shoulders around your spine until your chest face the back of your target, 90 degrees.


  • Your hips will be about 45 degrees.


  • Most of your weight will be transferred to your right hip.


  • Your arms should be across your shoulders to create a coil, not lift.


DOWNSWING


Starting the downswing with the proper sequence is the key to a good downswing.The lower body starts and initiates the downswing by a shifting motion.

  • Start by shifting your weight to your left side.
  • Drop your arms and hands down without losing the angle in your wrist hinge. Once the shaft is parallel to the ground , it should be above and parallel to the toe lines.
  • You shoulders will turn in response to your hips and hands movement.
  • Continue to turn and shift your weight to your left leg using it as a post by opening up your left hip and maintaining your spine angle.

You need to feel the clubhead from the inside feeling a shallow downswing.

IMPACT

At impact, the shoulders are square, hips open, weight on the left, same spine ahgle as address, hands forward of ball.


There are many different swing but all the good ball strikers have a similar impact position.


  • From the downswing, continue to rotate and shift your weight to left side by moving your left hip up and around your left side.
  • Hitting down at the ball is the proper way to elevate the golf ball using the loft on the club. Imagine a nail sticking out of the ground on a slight angle almost parallel to the ground. Your want to hammer the nail into the ground with a shallow descending angle of the clubhead
  • You should make contact right in the middle of the ball, like the equator on the earth, the divot starts after the ball is hit.
  • Your weight is mostly on your left side, right heel slightly off the the ground. Hands ahead of the ball with square shoulders and opened hips.
  • You want a sensation of compressing the ball.

FOLLOW THROUGH


Top left: Notice how much the hands released the club, right fingers just touching the grip.


Top right: Spine angle maintains the same on the follow through. Feels like lying on the pillow on the right side of your face.


Weight on left, arms releasing and extending down the target line maintaining spine tilt.

Turn clubhead for release


Forearms and wrist rotate through.


Lower body is out of the way so the arms can swing through.

The key to a good follow-through is a proper release of the clubhead.


From the impact position, the clubhead continues to extend down the target line with both arms straight maintaining your spine angle.


  • Weight shift and body rotation continues with the feel of a slight stretch on your left obliques.


  • Weight is on your left foot .


  • Right foot is up on the toe and right heel is off the ground.


  • Hands are over your left shoulder.


  • Chest and hips are facing your target.


  • Spine is tilted slightly to the right.


Most important about follow through is proper extension of the arms on the right path.


FINISH


Finish weight on your left side. Belt buckle facing the target. Right heel off the ground and right toe in the ground. Spine tilt slightly to the right.

Drill: Work in reverse

If you have a hard time getting to a balanced position, try this drill. Working yourself in reverse will get out of being too focused in backswing and downswing positions, this drill will help you focus on a balanced finish.

Start at your ideal finish position
Hold the club across your back
Keep your arms soft and relaxed
Point your hips to your target and tilt slightly to your right
Put most of your weight on your left side
Right heel off the ground , right toe in the ground
Right knee faces target
Feel the finish balanced position by holding it for several seconds
Swing the club back into your right side
Complete your swing into your finish position

Repeat the same process several timesIf you can start and return to the finish position consistently you are ready to hit golf balls. Just make sure your don’t lift or sway, just feel the rotation.

PUTTING

Putter head travels the same distance back and through
Grip the putter in your palms

On short putts, the putter travel straight back and through.


Use the logo on the ball to line up


The putter head is an upward stroke


Toss the ball to the hole to feel how much effort you need to putt


Practice putting to different distances


On the long putts, imagine a big circle around the hole and lag your ball there.


Your goal is to 2 putt or less each hole. Obviously from the shorter range you'll have a better chance of making the putts. From the longer range, you want to just get your ball close to the hole . If you get lucky, the ball may fall in the hole, otherwise walk away with 2 putts and move on. If you try too hard to make the long putts, you'll tend to leave yourself too far from the hole because you've probably put too much pressure on yourself in the first place.


PUTTING GRIP

The putting grip is different from the grip you would use to make the full swing. To putt well, it is essential to place your hands in the right place on the grip, right ball position, steady head, body and good rythmn and feel. There are many different putting putters and styles. The following is a basic putting style.


  • Place the putter grip in your palm along your life lines with the left hand on top and the right hand below.

  • Place your thumbs on the top side or flat part of the grip(usually the putter grip is flat on top), then wrap your fingers around the grip.

  • Lift your left index finger and slide the right hand closer to the left, place your left index finger on top of the trailing fingers of the right hand

  • Make sure you grip the putter lightly so you can stroke the putter instead of too much hit or stab.

PUTTING POSTURE

Putting is very personal and you see golfers with many different posture. I would suggest beginners to start with a basic neutral posture and find your preference as you golf more.


  • Stand about shoulder width

  • Position your weight on the balls of your feet evenly on both feet

  • Bend your knees slightly

  • Tilt forward from your hips until you eyes are directly above the ball.

  • Your arms can be straight or bend depending the length of the putter

  • Shaft leans slightly to the left

  • Make sure you are aligned square to your target(check on Alignment archive)

  • Key is letting your arms hang from your shoulders and being able to look down on the ball to the hole in a straight line

    BALL POSITION

Ideal ball position for putting helps roll the ball better on the green. The putter strikes the ball just as past the bottom of the arc creating topspin on the ball. The following exercise will help you find the ideal ball position.


  • From your putting set-up, drop a ball under your left eye

  • The spot where the ball lands is the ideal position
  • Line up the logo on the ball to the hole.

  • Place the putter head directly behind the ball, in the middle of the clubface. Match up the line on the putter and the logo of the ball.

  • Make sure you have enough tilt over your hips so your arms are not too close to your body and you eyes are directly over the golf ball.

PUTTING STROKE

The putting motion is a very gentle swing like a stroke, not a stab at the ball. The triangle formed between your shoulders and arms work like a pendulum. The key is keeping a very still head and lower body. The stroke is a gentle rocking motion of the upper body maintaining the same flex in your elbows and wrists. Focus more on the arms and shoulders moving not hands. The putter head travels back and forth the same distance. The putter head accelerates through the ball. Always keep your head down for putting.


  • For short putts, within 10 feet from the hole, gently rock your shoulders back and through on a straight line. Make sure the putter head travels back and forth equally

  • For longer putts, the putter moves on an arc according to your spine angle. The putter head will start from square position to slightly in on the backswing, back to square at impact and slightly on the finish.
PUTTING DISTANCE CONTROL
Speed determines the line. The firmer you putt the less the ball will break, as long as you don't leave yourself too far from the hole, you always want to accelerate through the ball.

All good putters have good feel. That’s the key to control the distance and speed of the ball roll. Here’s 2 drill to help you feel that.

1. Roll the ball with the right hand:


  • Set-up over the ball with a ball in your right hand

  • Keep your eyes at the hole and feel how much backswing or effort you need to get the ball to the hole by swing your right hand back and through

  • Roll or toss the ball towards the hole
The effort you need to roll or toss the ball towards the hole will be about how hard you need to stroke with the putter.

2. Feel the distance


  • Take 3 balls for this drill

  • Putt the 1st ball by keeping your eyes at the hole

  • Putt the 2nd ball by closing your eyes, feeling the distance

  • Putt the 3rd ball with a normal stroke looking at the ball
Repeat this drill several times; it will help you develop better feel and control over the speed of the ball.